 SMS Mobile API for Shopify – User Guide
Introduction
The SMS Mobile API app for Shopify allows you to send SMS and WhatsApp notifications based on order statuses and custom rules. Messages are sent directly from your mobile device, ensuring that customers receive messages from your actual number and can reply directly.
The only requirement is to have a configured account on SMSMobileAPI.com. This setup enables seamless communication between Shopify and SMS Mobile API, allowing messages to be sent from your mobile device effortlessly.
Also visit our official page to learn more about our Shopify app: https://smsmobileapi.com/plugin-shopify/
1. Communication Setup
To use the service, you must create an account on SMS Mobile API by downloading the mobile app or registering online. Once your account is created, an API key will be sent via email or available on your dashboard. This API key must be copied and pasted into Shopify for authentication.
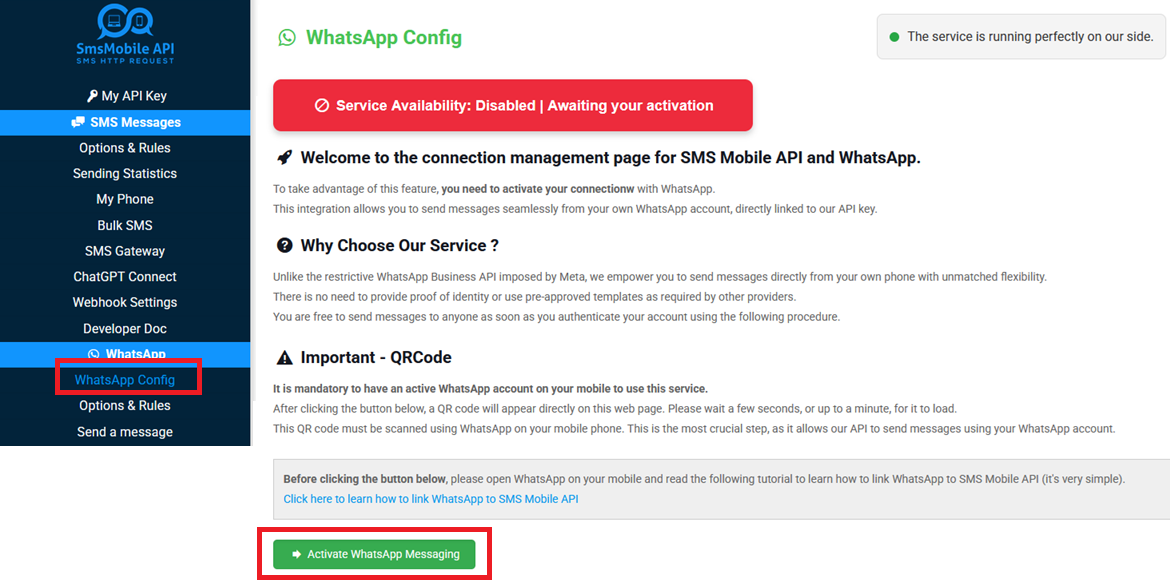
For WhatsApp communication: It is important to establish a connection between SMS Mobile API and WhatsApp. To do this, go to the dashboard and navigate to "WhatsApp Config" to initiate and verify secure authentication and synchronization.
For SMS communication: Ensure that the SMS Mobile API mobile app is installed and running on your mobile device with the necessary permissions granted to send SMS.
No technical knowledge is required to use this service. The setup is straightforward, and everything is managed via the dashboard and mobile application.

If you want to send WhatsApp messages, you need to go through an additional verification.
Visit your SMSMobileAPI dashboard to enable authentication securely
2. Choose Notification Method
You can configure SMS, WhatsApp, or both for notifications. Ensure that SMS sending is correctly configured on your mobile app, and for WhatsApp, complete authentication on SMS Mobile API Dashboard.
Important for WhatsApp messages: Your contact/recipient must be an active WhatsApp user to receive messages on their WhatsApp account. If the recipient does not use WhatsApp, the message will not be delivered.
A complete message history is available in the SMS Mobile API dashboard for real-time tracking of sent WhatsApp messages.

3. Order Status SMS Configuration
Select the statuses where you want to send an SMS and define a custom message.
Available Placeholders
You can use the following placeholders to insert dynamic data into your messages:
{{order_id}}- Order number{{customer_first_name}}- Customer's first name{{customer_last_name}}- Customer's last name{{current_subtotal_price}}- Order total{{currency}}- Currency{{total_price}}- Total price{{trackingCompany}}- Name of the chosen delivery company{{trackingNumber}}- Tracking number for the shipment- Over 70 placeholders available! Click here to see all
Variables such as {{order_id}} allow you to automatically insert information during an action and thus personalize each SMS. Add any variable at the desired place in the different SMS templates below.
Use the code
to insert a line break in your message.
Send SMS to the customer when:
- The order has been confirmed by the customer without an online payment.
This means that the customer has placed an order but has not yet completed the payment online.
Example: "Hello
{{customer_first_name}}, your order{{order_id}}has been received. Please proceed with payment to confirm your order." - The order has been confirmed by the customer with an online payment.
The customer has placed an order and successfully completed the payment online.
Example: "Thank you
{{customer_first_name}}for your order{{order_id}}. We have received your payment successfully!" - The order has been fully paid.
The order amount has been fully paid by the customer, and the processing can begin.
Example: "Your order
{{order_id}}is now fully paid. We will begin processing it shortly!" - The order has been fully refunded.
The customer has been reimbursed for the full amount of the order.
Example: "We have issued a full refund for your order
{{order_id}}. Please check your payment method for details." - The order has been partially refunded.
A portion of the payment has been refunded to the customer.
Example: "A partial refund has been processed for order
{{order_id}}. Contact us if you have any questions." - The order has been canceled.
The order has been completely canceled and will not be processed.
Example: "We're sorry, your order
{{order_id}}has been canceled. If you need assistance, contact us." - The order has been fully shipped.
The entire order has been dispatched and is on its way to the customer.
Example: "Good news
{{customer_first_name}}! Your order{{order_id}}has been shipped via{{trackingCompany}}. Tracking number:{{trackingNumber}}." - The order has been partially shipped.
Some items in the order have been shipped, while others are still being prepared.
Example: "Your order
{{order_id}}is partially shipped. The remaining items will be dispatched soon!"
4. Rule Manager
The Rule Manager allows you to define conditions for sending messages based on order data. When an event occurs, the system checks each rule and executes the defined message if conditions match.
How Rules Work
Each order event triggered by the customer or modified by an admin generates a set of data related to that order. These details are securely retrieved and processed line by line to check if any of the defined rules match. If a rule’s conditions are met, the corresponding message is executed and sent automatically.
You do not need to take any action! Everything is fully automated. The only thing you need to do is create the rules that you want to trigger based on the order information and status changes. Once the rules are set up, the system takes care of the rest.
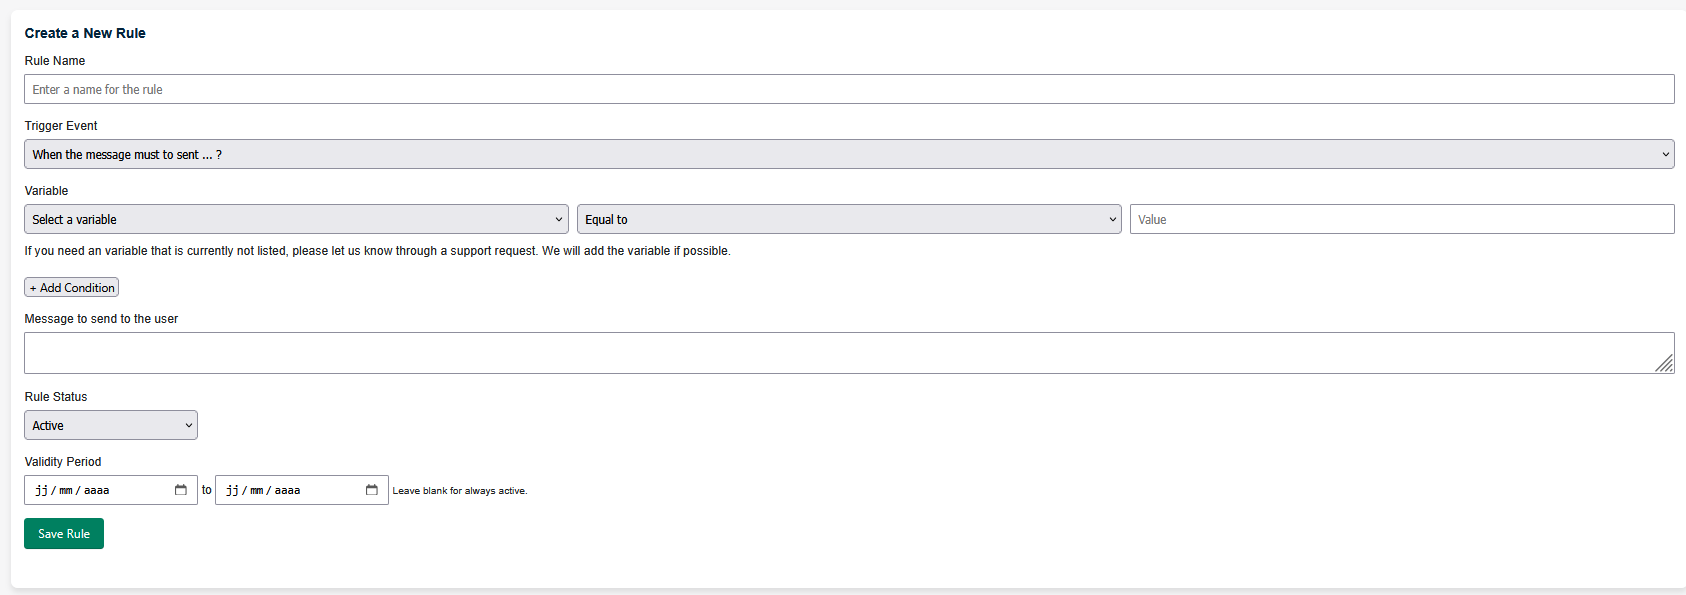
Creating a New Rule
Rules are created using a form that consists of multiple fields. Below is a breakdown of each field:
- Rule Name: A text field where you enter a descriptive name for the rule to identify it easily.
- Trigger Event: A dropdown menu where you select the event that will activate the rule (e.g., order creation, payment received, order shipped).
- Variable: A dropdown menu where you choose a variable from the list to personalize your message.
- Variable Condition: A dropdown menu where you define how the variable should be compared:
- Equals (=)
- Not Equals (!=)
- Greater Than (>)
- Less Than (<)
- Value: A text field where you enter the value to be checked when detecting whether to trigger the rule.
- Message to Send to the User: A text field where you compose the message that will be sent when the rule is triggered.
- Rule Status: A toggle button that allows you to enable or disable the rule.
- Validity Period: An optional field where you define a time range for when the rule should be active. Leave blank for always active.
Managing Existing Rules
Once rules are created, they can be managed in the rule management panel. You can:
- View existing rules: Each rule displays its name, trigger event, conditions, message content, and status.
- Activate/Deactivate rules: Enable or disable a rule as needed.
- Edit rules: Modify an existing rule to adjust conditions or messages.
- Delete rules: Remove rules that are no longer needed.
Examples of Rules
- Send an SMS if the order total is greater than $500.
- Send a WhatsApp message if the shipping city is Manhattan.
- Notify customers when an order is partially refunded.
- Alert the admin if an order is canceled.
- Send an SMS when an order contains more than 10 items.
5. Advertising Campaign Management
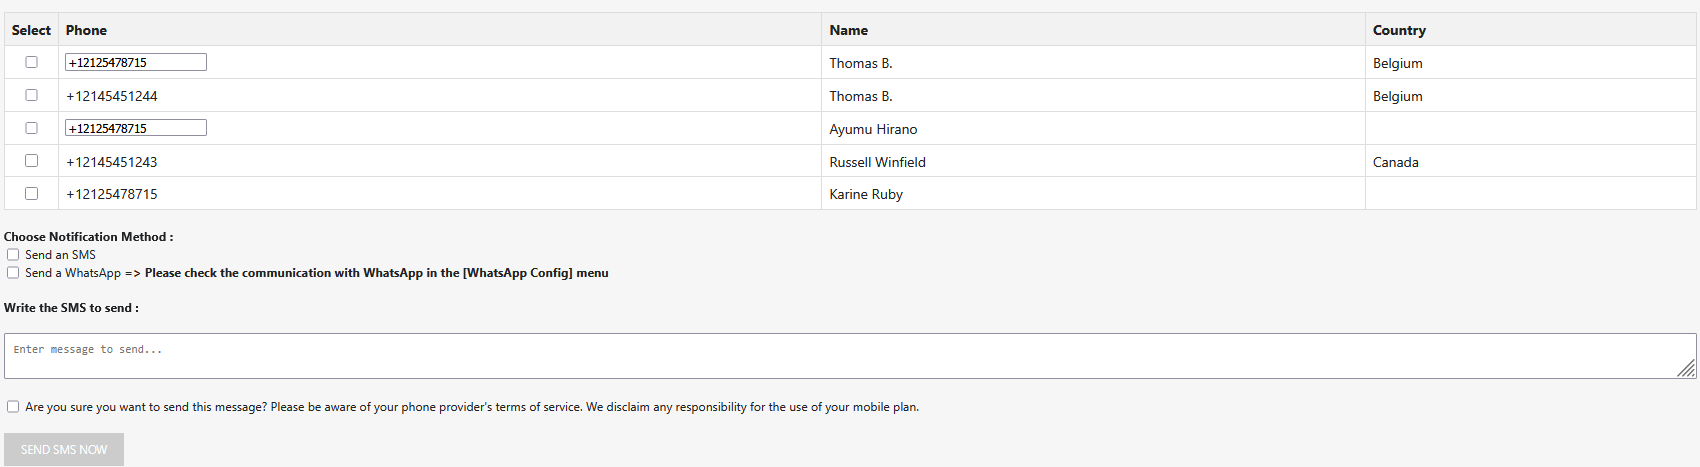
Create and send bulk messages to customers based on pre-defined lists. Select recipients and customize messages.
For creating your SMS or WhatsApp marketing campaign, the app automatically retrieves all your contacts.
Then, select the contacts to reach out to, choose the message to send, and select the preferred communication method.
(Make sure that your SMS and WhatsApp configurations are correctly set up—see the explanation above.)
6. Interface Language
The interface supports multiple languages, which can be configured in settings.
The app is available in multiple languages, including English, French, Spanish, Portuguese, and German.
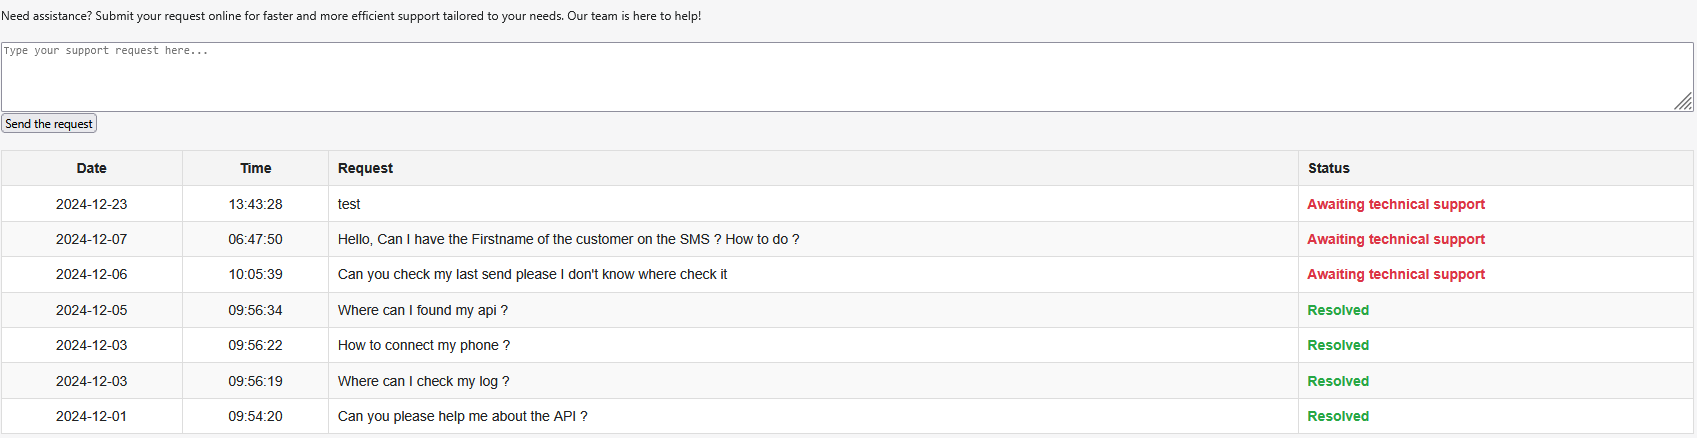
7. Support & Assistance
For help, use the 'Help & Support' section in the app's Shopify page.
Help & Support
Need assistance? Submit your request online for faster and more efficient support tailored to your needs.
It is strongly recommended to use the online support form, as all requests are automatically centralized and linked to your user account.
This ensures better tracking, faster response times, and direct handling by the technical support team.
If you send a simple email, your request may get lost among other general inquiries, making it more difficult to track and resolve your issue efficiently.